 Save
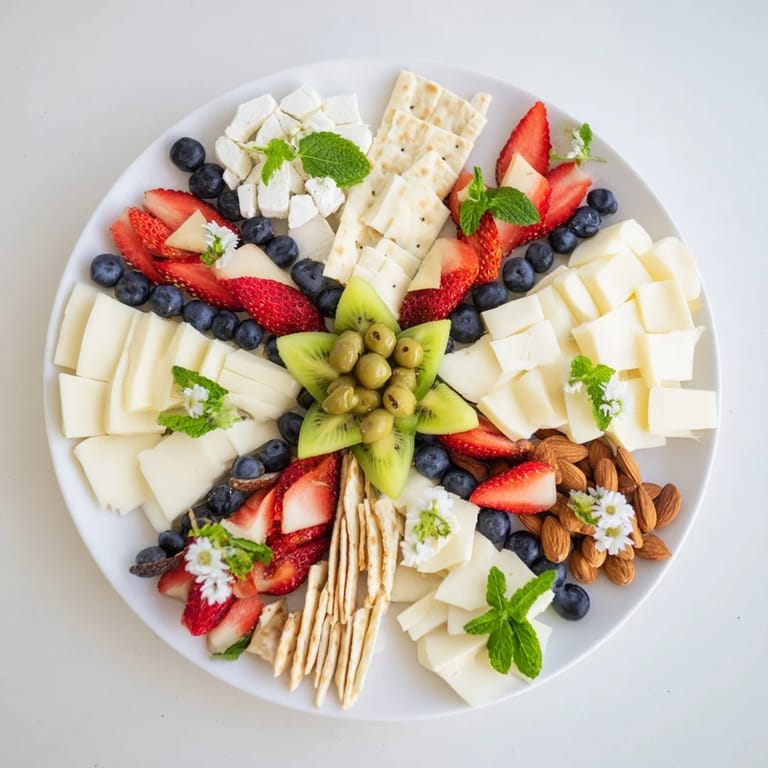
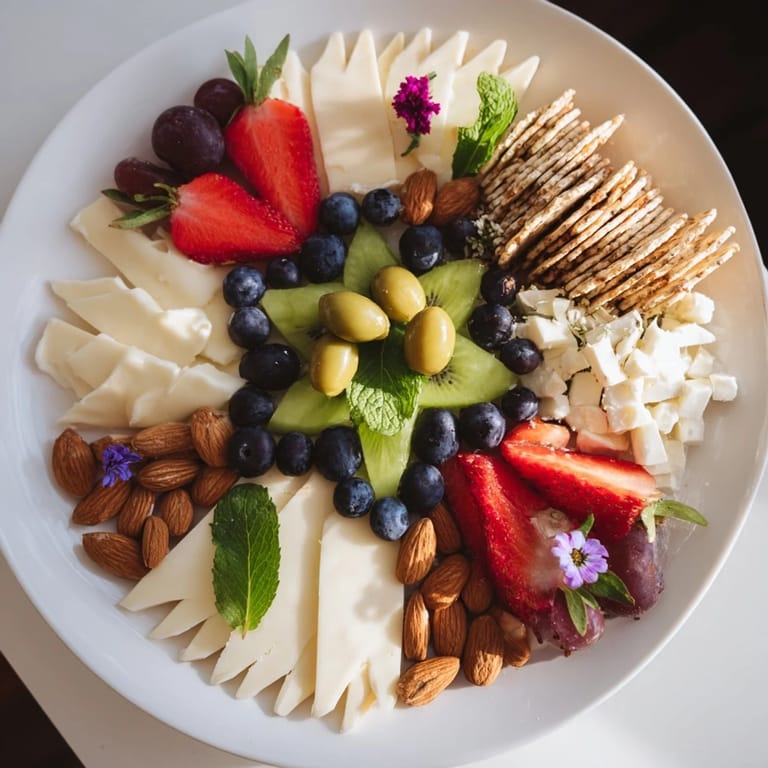
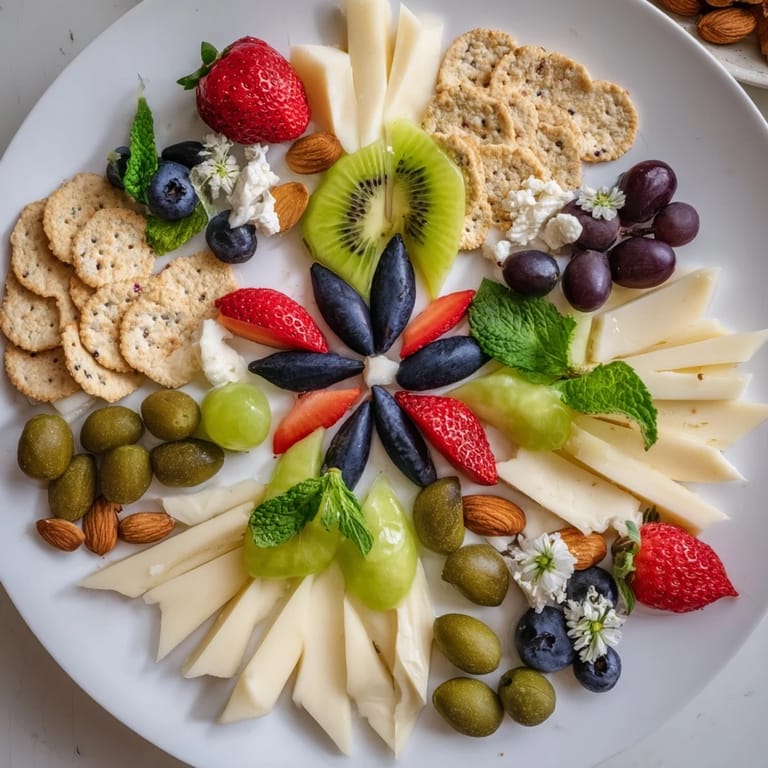
Save I'll never forget the moment I first saw a platter arranged with negative space—a gorgeous star cut out by the absence of food, surrounded by cheese, fruit, and crackers. A friend had created this for her engagement party, and I was mesmerized by how such a simple concept felt like edible art. That night, I realized that sometimes the most impressive dishes aren't about what you put on the plate, but about the beautiful emptiness you intentionally leave behind. It changed how I think about entertaining.
I made this for my sister's birthday brunch last spring, spelling out her initials in negative space with berries and cheese. Watching her face when she walked into the room and saw her own letters formed by the empty spaces—I've never seen her smile quite like that. It taught me that presentation isn't vanity; it's how we show people they matter to us.
Ingredients
- Brie cheese, sliced (100 g): The creamy, buttery foundation that makes guests feel fancy. Slice it just before arranging so it stays fresh and doesn't dry out.
- Manchego cheese, sliced (100 g): This Spanish beauty brings a firm texture and slightly nutty flavor that contrasts beautifully with the soft Brie. It holds its shape and adds visual interest.
- Goat cheese, crumbled (100 g): The tangy accent that wakes up your palate. Crumble it just before serving to keep it light and cloud-like.
- Seedless red grapes (1 cup): These are your color jewels—use them to define edges or fill small spaces. The sweetness balances the salty, savory elements.
- Strawberries, halved (1 cup): Fresh and vibrant, these add pops of red that guide the eye through your design. Always choose firm ones that won't weep juice onto your beautiful arrangement.
- Kiwi, sliced (1): That shocking green interior is pure visual magic. Slice these last, as they discolor quickly when cut.
- Blueberries (1/2 cup): Tiny flavor bombs and natural color blocks that help define your negative space shape. They're forgiving to work with since they won't stain your hands.
- Thin crackers (12): These act as anchors, holding other elements in place. Choose ones you actually enjoy eating—this isn't just about looks.
- Roasted almonds (1/2 cup): The texture element that says this platter is thoughtful. Their earthy tone grounds the brighter colors around them.
- Green olives, pitted (1/4 cup): They add sophistication and a savory punch. Pit them yourself if you can—it tastes fresher.
- Fresh mint leaves: The final flourish that says fresh and alive. Add these last, right before serving, or they'll wilt and lose their brightness.
- Edible flowers (optional): Only add these if you're certain they're food-safe. They transform a platter into a work of art, but a regular platter is beautiful too.
Tired of Takeout? 🥡
Get 10 meals you can make faster than delivery arrives. Seriously.
One email. No spam. Unsubscribe anytime.
Instructions
- Choose your shape:
- Spend a moment imagining what would delight the people you're serving. A star? An initial? A heart? Sketch it lightly on parchment paper, making sure the shape fits your platter with at least an inch of space around it. This is your secret blueprint.
- Set your guide:
- Place the parchment paper right on your platter. This template will keep you honest as you arrange. You'll remove it later to reveal the clean, crisp negative space.
- Build your foundation:
- Start arranging your cheeses and crackers around the parchment outline, clustering them in groups rather than scattering. Brie next to crackers, Manchego nearby, pockets of almonds between them. These heavier elements won't move, so place them first.
- Fill with color:
- Now comes the fun part. Arrange your fruit around and between the cheese clusters, always respecting the invisible boundary of your negative space. Halved strawberries can line edges like little sentries. Grapes fill awkward gaps. Blueberries add pockets of deep color.
- Add texture:
- Scatter almonds and olives into the remaining small spaces. They add visual interest and give people something unexpected to discover as they eat. Don't overthink this part—there's beauty in slight imperfection.
- Reveal the magic:
- This is the moment. Gently peel back the parchment paper, lifting slowly so nothing shifts. Your negative space should emerge clean and striking, like an optical illusion made of food.
- The final touch:
- Scatter fresh mint leaves and edible flowers (if using) across the platter in the last few minutes. This keeps them bright and adds that just-picked freshness that makes people feel special.
- Present with intention:
- Step back and let people see this before they eat. Encourage them to take pictures, to admire it. Food made with this kind of care deserves to be celebrated before it disappears.
 Pin it
 I still think about the moment my daughter came into the kitchen while I was finishing this platter, and instead of asking when she could eat, she just stood there staring. She said it was too pretty to mess up. We compromised—she took a photo first, then we demolished it together. That's when I knew this dish was about more than hunger; it was about wonder.
Making This Your Own
The beauty of negative space is that you're not just following instructions—you're telling a story with your hands. Once you understand the concept, the possibilities multiply. I've done this with beach themes and snowflakes, with guest monograms and geometric patterns. Each shape changes the energy of the platter. A star feels celebratory and bold. Initials feel deeply personal. A simple circle feels modern and zen. Think about your occasion and let the shape reflect it.
Swapping for Your Preferences
If cheese isn't your guests' favorite, you can build the same platter around cured meats, roasted vegetables, or even hummus and breads. For a dessert version, replace everything with dark chocolate pieces, white chocolate shavings, macarons, biscotti, dried apricots, and candied nuts. The negative space principle works with any ingredients—the magic is in the intention, not the ingredients themselves.
The Secrets That Make the Difference
Proportion matters more than perfection. You're aiming for visual balance, not mathematical precision. Let the arrangement breathe. Empty space between elements makes each ingredient shine brighter. Also, temperature matters—arrange this no more than an hour before serving so cheeses stay firm and fruits stay crisp. If you're working ahead, keep everything in the fridge and assemble just before guests arrive.
- Use a large platter so you have room to breathe between ingredients—cramped arrangements look chaotic instead of intentional.
- Place your most visually striking elements (like halved strawberries with visible seeds or jewel-toned berries) to emphasize the edges of your negative space shape.
- Step back frequently and look at your work from above—perspective changes everything, and what looks balanced up close might feel off from across the room.
 Pin it
 There's something profound about creating something beautiful that's meant to be destroyed by enjoyment. That's what this platter teaches us about hospitality—that the most meaningful gifts are the ones we make with our hands and serve with joy, knowing they won't last forever. That's exactly why they matter.
Frequently Asked Questions
- → What is negative space in a food platter?
Negative space refers to the intentional empty areas between ingredients that form shapes or patterns, enhancing visual appeal.
- → Which ingredients work best for this platter style?
Soft and firm cheeses, assorted fruits, crunchy crackers, nuts, and colorful garnishes help create contrast and texture in the layout.
- → Can this platter be customized for different occasions?
Yes, you can personalize negative space designs to spell initials or create themed motifs suitable for parties or celebrations.
- → How do I maintain the negative shapes when arranging the platter?
Use parchment paper guides and arrange ingredients carefully around the drawn shapes, ensuring the space remains clear before removing the guide.
- → Are there dairy-free or gluten-free options?
Yes, substitute cheeses with plant-based alternatives and use gluten-free crackers to accommodate dietary preferences.